Finished Mantel and Final Journal Entry

As you can see its been a while since my last entry. Essentially this is because I have been slowly scaling back Ceorfan Works in anticipation of going back to University this September. This reduction in scope has also been coupled with Thomas Philpott Cabinet Makers, the company who I rented space from, moving facility and expanding, so helping with that has also taken up a lot of time.

I have been working with the CNC but almost exclusively on creating parts for their work. Going forward I’ll still be doing some consultancy with them but mostly spend my time focusing on my studies.

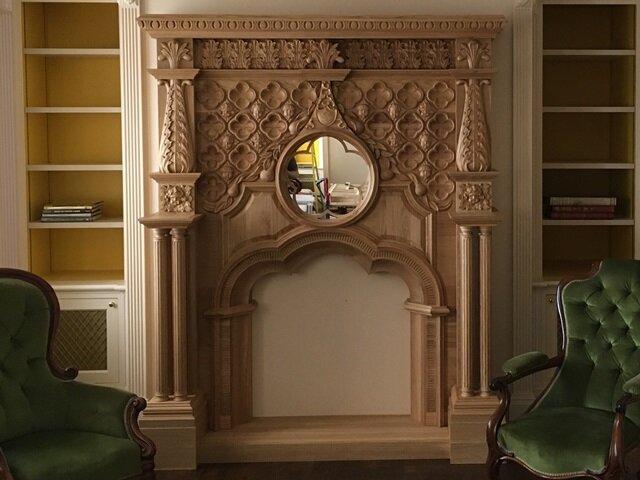
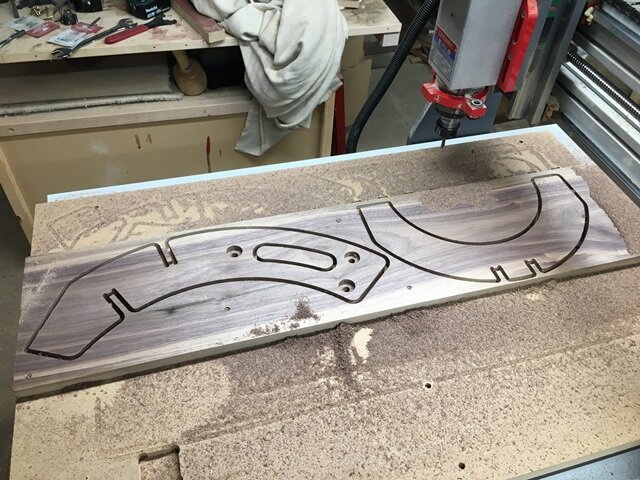
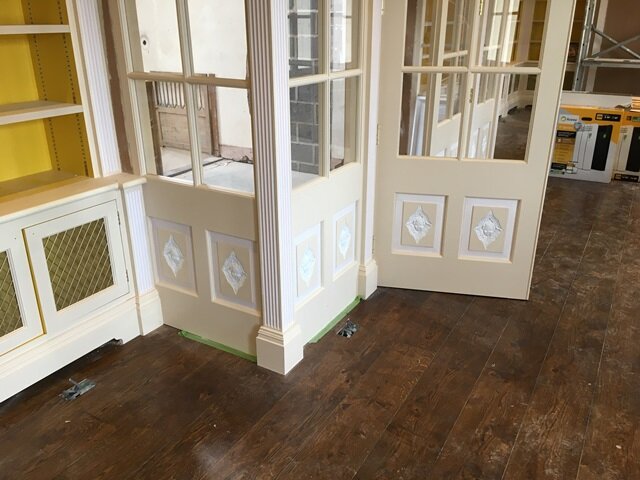
I thought it might be a good idea to tidy things up here by explaining the recent lack of activity and also sharing some images of the huge mantel that I was teasing for much of last year… You can see some images of the final few weeks of production of the mantel and its almost identical twin below. The first image shows the spindles having their flutes machined into them using a jig we created. The subsequent 3 images show the assembly in progress and final two show the mantel in position, in the context of the room and close up. Its twin went at the other end of the same room. They both looked incredible when finished although it was a huge slog getting them done…

Well, that should be the final entry for Ceorfan Works, it has been fun but I’ve realised I don’t have the passion to continue it as a business and instead have become much more interested in how our brains work and why we behave the way we do, hence my going back to university to study psychology. At some point this website may morph into something more related to my new life direction. Thanks for the support.

Acanthus, Signage, Desk Edges, Stiffy's and Gates

My final update to tidy up the end of the year. First up I continued carving parts for the two chimney pieces that we’ll hopefully start to make some actual progress on next month/year. Below you can see a strip of acanthus leaves in the first image and a single long vertical flourish in the second and third. Still quite a lot more to carve and we need to start putting the boxes together that all this will attach to as well…

Next you can see three images below showing a solid oak sign I made to be given as a gift for Christmas. This was created from a low-res jpeg image of the clients logo. In the first photo you can see it at the stage where the logo has been carved through a special sign makers masking-material that was stuck onto a pre-sealed oak panel. In the second image I’ve painted the areas that were machined, using the mask to protect the parts I didn’t want to paint on. In the last image you can see the finished oiled sign - after the masking has been removed leaving a lovely crisp painted logo. Very nice indeed…

Lastly a few random items from the workshop in December. The parts in the first image were created for a long-time artist client, they are some interestingly shaped (you really have to see the side profile to see how interesting…) solid oak handles that will be used to create Gerhard Richter style paintings. Each of these has an aluminium strip on the bottom of them that a piece of perspex can be stuck to when in use. The second photo below shows the edge for a desktop being carved on the big green CNC. This was pre-cut and glued before being carefully positioned back on the machine and then the curved edge shape carved into it. In the third image is something I was not involved with but I thought looked great. This pair of gates (one is behind the other) were designed by Tom and then most of the parts carved on the big green CNC. Finally they were hand-fettled and assembled by Al (whose back you can see in the image). I think these are a really nice elegant design and a great showcase of how design experience, computer cutting and human skill can work together to make something great.

That’s it for 2020. More to come in 2021 as I try and figure out how to balance what I do in the workshop with continuing to pursue becoming a psychologist…

Chimneypiece carvings, AK-47 Light, Oak AK47, Cheesy Pun Boards and Jigsaws Frames

Another mixed selection of projects have been through the workshop in the last few weeks. First up I’m continuing to carve parts for the two chimneypiece’s we’re building. You can see in the first three photos below some acanthus leaves and cherubs. Much more to carve this month and hopefully the build proper will start in January.

Secondly I worked on an unusual design to create a standing lamp from a de-activated AK-47 (actually a Chinese Type 56 but essentially the same thing). I designed a walnut stand that you can see cut and assembled in the first two images below. The gun stock nestled in between three M12 bolts that went through the stand to clamp it in place. The bulb holder was screwed onto a thread I mounted on the part that steadies the bayonet and holds the cleaning rod. The wire was threaded through the cleaning rod hole into the front of the magazine and then through the main body and stock to come out the hole where the cleaning kit goes. The finished light can be seen in the third image below. The overall effect is very striking, showcasing the iconic shape of the gun but thankfully for a much more peaceful use than it was designed. As a piece of interior design it would certainly be a talking point.

Finally the work on the light inspired another client to ask me if I could make a solid wooden replica of an AK-47. This can be seen in the first picture below and is made in three pieces of oak. The main body, handle, trigger, barrel and stock are all one piece with the magazine holder and magazine as separate parts. I’d guess this will be the end of my foray into weapons making… Interesting to replicate though and these are certainly unusual piece to work on. The second image below couldn’t be further away in subject. These are a pair of Xmas cheese boards made from a nicely grained piece of Ash I had laying around, bad pun definitely intended. Finally for this post, an update on a project from last year, the jigsaw frame we made for Stiffy Art, here you can see it in the third picture below, as it was always intended to be used displaying some of John’s abstract paintings in a really interesting and unique way. Really nice to see it complete. That’s all for now, hopefully one more update before Christmas and a couple of weeks at home out the cold of the workshop… Stay safe, onward and upwards.

Painted Sign, Learning Toys, Angular Circles, Cherubs and Assault Rifles

I’ve had a decent two week block in the workshop since the last update. Tom and I have started to get to grips with the chimney piece design and I’ve been able to work on some other jobs along the way.

First up is a sign I made for my sister’s business. This was a scrap piece of Ash (a shelf that did not get used) that I sanded, sealed and covered in sign makers vinyl masking material. I then carved the letters through this as you can see in the first image below and applied a couple of coats of enamel spray paint (second image). Finally the mask was removed to leave just the letters painted as shown in the third photo and a couple of coats of oil applied to finish.

For another family member I have been prototyping some learning toys they are hoping to start marketing. Shown in the first image below, these will be tested and modified accordingly. These were finished in mineral oil as it is non-toxic and suitable for children to handle, I was pleasantly surprised how nice a sheen this left on the parts.

The second and third photos below shows some parts I cut to make 4 wooden circles that were required to surround a circular lift shaft at a clients house. In total I cut 48 straight pieces with the appropriate angle on each end, sets of 12 were then glued (with biscuit joints) to make a dodecagon. This was then re-machined on the large CNC to cut inner and outer circles, 1m across the internal diameter.

Finally two parts that show the diversity of what I make. Firstly a familiar motif to readers of this blog, cherub blocks. These can be seen in the first image below being roughed and then the finished version in the second. I am pleased to be cutting these as they are the first components for the chimney piece project that has now been months in gestation. I have 18 of these to make before I move onto some non-cherubic carving for the same project. Then as a total contrast I had a different customer who wanted me to make him a wooden AK-47 to go on his wall. You can see that being cut in the third image below…

Moving forward we should start to make real progress on the chimney pieces before the end of this month and I’ll hopefully have images of that work in progress. I’ve also got another AK-47 based project too, to create a standing lamp… Onward and Upward.

Door Headers, Soma Cube, Paint and a Covid Pumpkin

It’s been an interesting month or so since I updated this journal. I was hoping to be back in the workshop and fully up to speed again after my gardening adventure. Unfortunately on my return I found the bearings had gone in the spindle on my CNC. I took it to a specialist company to rebuild it and found the cost to do that was more than ordering a new one… So I ended up having to order an Italian spindle from Germany. Once it arrived I was able to get it back on the machine and spinning the right way without too much drama and so was up and running again by the middle of October.

Having had a solid couple of weeks in the workshop I am slowly getting up to speed again. I’m still waiting to get started on the big chimneypieces but in the meantime have done a bit of other work. In the first three images below you can see a door header based on one of the familiar cherub motifs I’ve used a lot over the past few years for a specific client. I made two of these parts, each one needed to be a slightly different size and layout, these will be part of the decoration over two doors in the clients house. As you can see from the second image it required two setups as it was too long for my CNC. Due to the thickness of the areas where the faces are, an extra piece of poplar was stuck on and you can see a difference in colour between them in the photos.

I’ve also started working on some personal projects again to use up some of the material I’ve collected and not used… Something I’ve been meaning to make for a while is a Soma Cube. I made one of these when I was doing my Design A-Level, 30-odd years ago. I thought the CNC would allow me to make a much better and bigger one than I’d created then. I had a 45mm thick piece of Sapele left over from a previous job that looked perfect for this. I designed it so each mini-cube that the pieces are constructed from was 45mm square so I could just cut out the required lengths to make up each part. For the joints I added 6mm dowel holes so the part would lock together and stay straight and square when I glued them. This worked really well. You can see the outlines of the parts I cut in the first image below. The glued components in the second image and the completed cube in the third. Other than light sanding and oil the only post CNC operation needed was to square the inside corner of the L shaped piece.

Finally a bit of AOB to finish up. Regular reader (if there are any) would remember the large cherub I’d constructed out of a number of pieces of Sapele. This has now been painted by a sign maker to colour it the same as the original that I copied the model from. You can see this in the first image below. This will be installed on the outside of the clients house to cover some air ducts… The middle picture below shows an abstract painting called “Blue in Green” that I made for home. I’m not sure if this qualifies as art but I enjoyed the process and the finished object at the least is a very satisfying piece of decoration. The final image below is an indicator of the moment of history we find ourselves in. This is the pumpkin design my son came up with - based on the face-mask emoji… we certainly do live in interesting times. Stay safe and be kind to yourself and others. Onward and Upwards.

Landscaping & Garden Design

I’ve had to take a big chunk of the last couple of months out of the workshop to landscape the garden at our holiday cottage. I thought this might take a couple of weeks but due to massive underestimation of time (I’ve never landscaped anything before) and some serious mission creep its taken best part of 5 weeks with some help (thanks Jack…) I’m pretty pleased with how it looks though. As you can see from the first picture below, after we’d had a new sewage tank and soak-away installed it was essentially a muddy slope. This needed terracing, a lot (80) sleepers to retain everything and then plenty of levelling, topsoil and stones.

There are now four sections to the garden, the bottom part with the terracing, sleepers and white and green stones, the next section with the mulch and wildflower meadow, a shaded woody glade with stone path and mulch beds full of ferns and finally a grass lawn and the decking which was already there. What an effort but its been worth it. I have jury duty coming up so I’ll be out of commission for a while longer then back in the workshop and making the long talked about but yet to appear chimneypieces.

Arch Valance, MDF Door, Photos from No. 3

As mentioned in the last post I’ve been working on the Chimney Piece design for No. 3. There has been a lot of work but with mixed results. The client is not very happy with a couple of the more recent cherubs so we’ve been scratching our heads a bit this week and looking to redesign some elements to rely on some of the Cherub models I already have. We’ve also started to think much more realistically about how to make the two Chimney Pieces and adjust the design to fit different sized areas. That has meant some proper 2D technical drawing to get the final layout complete. That’s coming along and overall I think it’s looking a lot better but you’ll see more of that next month and September as we start the build. With this in mind though we did go over to No. 3 for a final measure and to look at the room. In the first three images below you can see some photos of earlier work that is now installed and has at least one coat of paint on it. In particular you can see the coffered ceiling in image 3 and some of the many finials I made for it along with the egg and dart moulding…

I have made a few other pieces since the last post in amongst the design work. The fourth and fifth image below show an arch valance I carved to match some existing moulding to go round a door frame. The last image shows a door I made (also for No. 3) from a single piece of high-grade MDF. This was designed to look just like the doors from the main room and to echo the same pointed shape at the top. It came out well and makes more sense for speed and stability than constructing a traditionally jointed door in this space.

That’s all for this post - August may be a bit slack as I’m going to be off for a while spending time with family and doing some work at our holiday cottage… until next time stay safe. Onward and Upwards.

A Cloud Sign, Blind catches and another Cherub

I’ve been continuing to model more parts for the ChimneyPiece for No. 3 while also working on a few quick jobs that needed cutting. The first two images show a sign I made for my sisters’ new business. I went back and forth with her a bit on the design, once she was happy I found a nice oak off-cut, limed the surface and then v-carved through before applying a few coats of UV resistant Danish Oil. I think it came out well although the oil did dull the lime a bit so next time I might use a light paint coat instead. The third and fourth photos show a set of parts I cut that will act as a catch for pull down blinds on velux ceiling windows. These will be attached to the sides so the dowel in the bottom of the blind can catch on them to adjust the amount of light coming in. Finally the last two images show one of the new cherubs I’ve been working on for the Chimney Piece. I think it may need a bit of tweaking but looks pretty good for the first test cut.