
To finish up some business from the last blog entry you can see in the first picture below the fully painted Mayan Pyramid my son and I made for his school project. The teacher was very happy with it but more important we really had fun making it and I think he learned a few things (I know I did)…
The second image below shows some bought parts that let wires come up through a hole in a desk. The guys in the workshop had lost one of the tops so I made a new one (the one on the right) for them. Really nice to quickly be able to make a simple component without having to wait for it to be ordered.
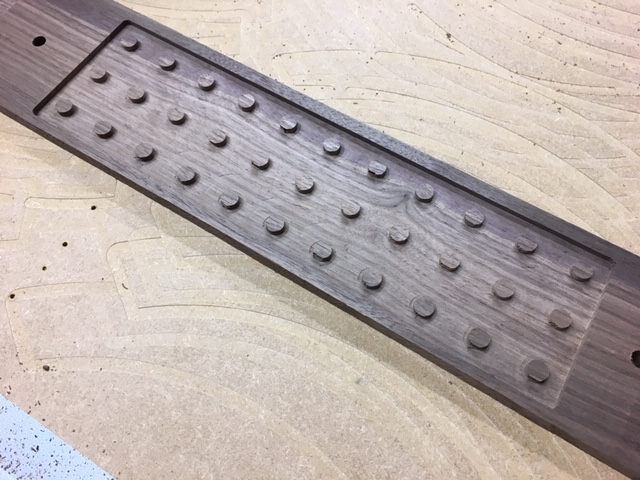
The third image on the top row shows a 2.4m (8 ft.) board, being carved by the CNC. To carve parts this long I have to pull them through the 900mm bed carefully locating them to ensure they are straight and indexed in the right place. I have good method for this now using a jig to keep it straight and a known tool position to locate its length correctly. The design shown in the image uses a combination of V-Carving toolpaths with a flat bottom pocket and also the fluting toolpath for the swept shapes in between - this is relatively quick to machine but still take a while when you need 6 metres of it. To secure this under the beam where it will be installed I cut 10 mm holes for the screw to sit within. To cover these I carved some decorative square-domed walnut plugs which you can see in the second row of photos. The first one shows the back with the 10 mm circle that will insert into the hole. Once this side is cut then are flipped over, aligned accurately using dowels and the top dome shape carved with a small ball-nosed tool. I left tabs to hold them in place and then trimmed these off with a knife and sanded them clean on a disk sander. You can see the finished parts in the photo below with the metal ruler. These small accurate pieces are very satisfying to make and turn a negative (the screw hole) into a decorative positive addition to the design.


The beam that the long carving shown above is going onto the base of also has decorative sides. Running along the length will be arches. Each one is made from the components shown in the first three photos in block below. These will have a 4mm wide walnut bead glued into the centre and then be sawn using the MDF jigs you can see in the middle photo. These will go together make the joint to complete the arch.
The top part of the beam will include a decorative moulding that will have an egg and dart element inserted to it. A lot of this last week has been spent carving lengths of this as you can see in the bottom three images. These have to be indexed through and aligned as accurately as possible. You can normally see a slight witness line where they overlap but this is easily sanded out. I still have about 5 metres of this left to carve. Each metre takes about 3 hours to cut using a tool with a 1.5mm (1/16”) tip diameter to get the fine detail…


Finally the guys in the workshop needed some 2D parts cutting which they can make by hand but the CNC can do more accurately and quickly. The first of these was some dividers cut out of 15mm thick maple wood. These had to interlock to create the grid to go in the drawers. I used the T-Bone fillet option in the Vectric software to allow the joint to fit properly as you can see in the middle-top photo below. The final photo shows the parts waiting a finish sand and final assembly.
The last three images show some long MDF parts required for a small rise of stairs that had to fit round some existing newel posts at a customers house. Again I needed to index these through the machine as the boards were 1500mm long but everything came out well and the guys were very pleased with how easy these were to assemble. You can see the finished set of stairs waiting for install in the final image.


